
iPhone Food Photography (2025): 8 Tips for Better Restaurant Photos
Did you know that over 80% of food photos shared on social media are captured using smartphones? In today’s visually driven world, mastering iPhone food photography has become essential for anyone looking to elevate their culinary creations online.
This article will guide you through the art of capturing mouthwatering images with your iPhone, providing tips and tricks that will help you stand out in a sea of mediocre food shots. By the end, you’ll be equipped with the skills to make your dishes shine and entice your audience.
Why iPhone Food Photography is Important
In today’s digital landscape, iphone food photography plays a pivotal role in shaping guest expectations and driving restaurant marketing efforts. With diners increasingly conducting research online before making dining decisions, captivating images of a meal’s delectability can significantly influence their choices.
Print menus adorned with authentic photos not only enhance the dining experience but also elevate the overall perception of a restaurant’s brand. As highlighted in QSR Magazine, establishments that invest in high-quality iphone food photography are often seen as more appealing, leading to increased foot traffic and higher sales.
Moreover, the power of appetizing photos extends beyond traditional print mediums; they are essential for impactful website visuals and engaging social media ads. Intriguing images shared on platforms like Instagram or Facebook can spark conversations, encouraging online sharing and creating a buzz around a restaurant.
In an era where visual content reigns supreme, restaurants must harness the power of compelling photography to stand out in a crowded marketplace. Ultimately, well-crafted restaurant photos serve as a visual invitation, enticing potential diners to experience culinary delights that go beyond the plate.
8 Tips for Better iPhone Food Photography
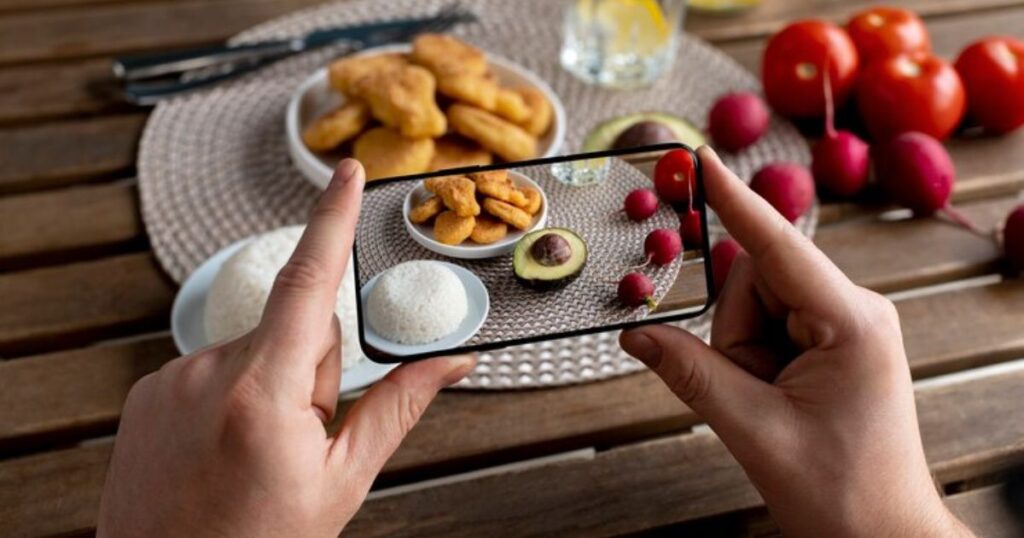
When it comes to iPhone food photography, especially in the realm of food, lighting is your best friend. Natural light can transform even the most mundane dish into a visually-appealing masterpiece. Position your plate near a window or outdoors during golden hour for soft, flattering illumination.
Avoid harsh overhead lights that can cast unflattering shadows and distort colors. This simple adjustment can elevate your food photography, making it perfect for social media pages or even a restaurant website.
Incorporating props can also enhance your shots dramatically. Think about using textured tablecloths, vibrant utensils, or even fresh herbs to create a narrative around your dish. These elements not only add depth but also help convey your brand’s identity if you’re capturing images for online ads or marketing materials.
Additionally, don’t shy away from experimenting with angles; a top-down shot can showcase the arrangement beautifully, while a side angle might highlight layers and textures. Remember, honing your photo-taking skills is a journey—embrace it and let these food photography tips guide you toward creating stunning, on-brand photos that resonate with your audience.
Use the Grid Feature to Follow the Rule of Thirds

The Rule of Thirds is a fundamental principle in photography that can transform an ordinary shot into a captivating image. By employing the 3×3 grid feature available on your iPhone, you can effortlessly visualize this rule during photo planning.
The gridlines divide your frame into nine equal parts, creating natural spacing that guides you in placing your focal point at one of the intersection points. This technique not only enhances visual alignment but also introduces an element of balance, making your photos more aesthetically pleasing.
In food photography, for instance, using the grid feature allows you to experiment with symmetry while maintaining dynamic compositions. Instead of centering your plate of culinary delights, position it along one of the gridlines, drawing the viewer’s eye to the vibrant colors and textures in a way that feels intentional yet organic.
Incorporating these camera settings into your routine can elevate your photography game, ensuring that each shot tells a story rather than merely documenting a moment. Remember, the beauty of the Rule of Thirds lies in its flexibility; it invites you to explore different angles and perspectives while encouraging creativity in every click.
Leverage the Leveling Tool: iPone Food Phototgraphy
Leveraging the leveling tool can transform your iphone food photography from amateur to professional in an instant. When capturing aerial shots, using a camera lens level ensures that your horizon remains straight, eliminating distractions in your composition.
The grid feature, often found in modern cameras, serves as a visual guide to help align your subjects perfectly. By positioning the yellow and white cross at the focal point of your scene, you can achieve a centered look that enhances the overall aesthetic of your image.
In iphone food photography, achieving a balanced composition is crucial for enticing viewers. Utilizing the leveling tool to keep your shot level to the ground not only enhances clarity but also contributes to a polished and professional appearance.
This best practice not only elevates the visual appeal but also engages your audience more effectively. Remember, a simple iphone food photography tip like this can make all the difference, ensuring that each shot you take captures attention and conveys your artistic vision seamlessly.
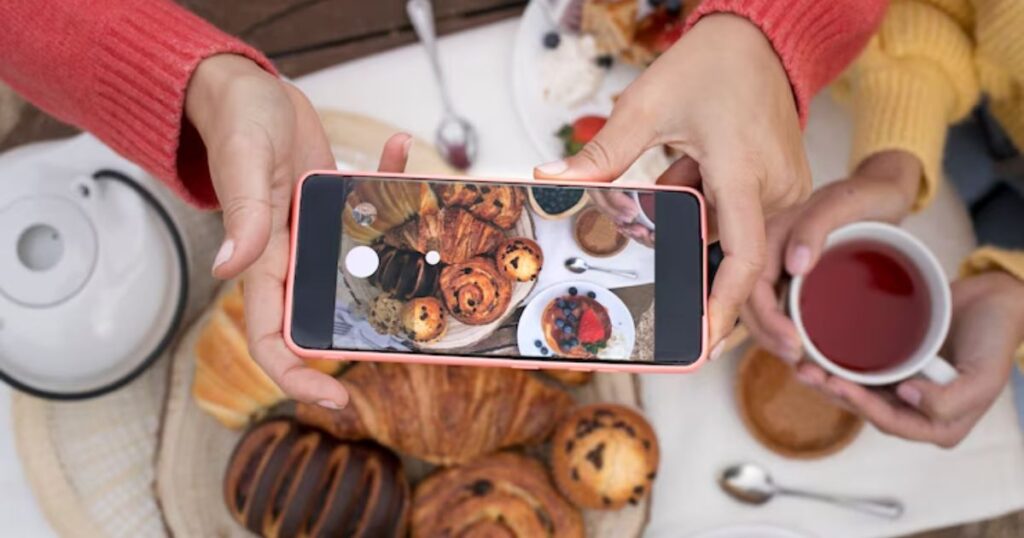
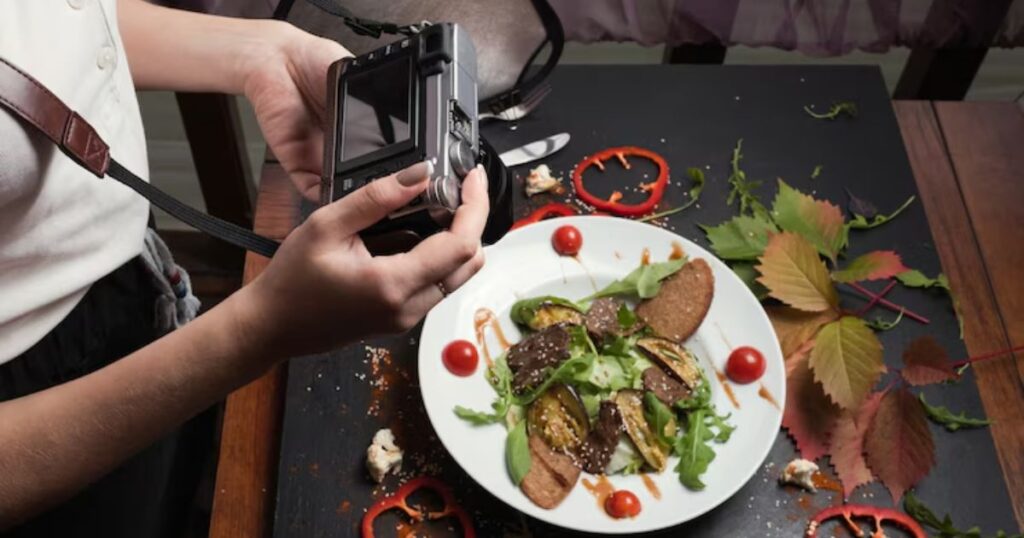
Think Through Props and Arrangement

When capturing that perfect shot of your culinary masterpiece, think beyond just the food on the plate. Props play an essential role in setting the stage for a visually appealing image. Consider incorporating elegant utensils and napkins that complement your dish, while also ensuring they don’t overshadow the main event.
A leveled shot can create a sense of balance, drawing attention to both the foreground focus of your meal and the background detail that enriches the narrative. For instance, imagine a beautifully plated dish from One White Street, where the ambiance of the restaurant can subtly peek through, enhancing the story told through your Instagram food photos.
Using iPhone depth capture and Portrait mode can elevate your food photography aesthetics even further. This technology allows you to create a stunning bokeh effect, blurring the background while keeping the main dish sharp. This technique not only highlights your food but also invites viewers to feel as though they’re part of the experience, making them hungry for more than just a visual treat.
Creative framing is crucial here; consider including hands and glasses in the shot, which adds a dynamic element and tells a story about sharing and savoring. Whether you’re photographing a dish from Bresca or your own kitchen creation, remember that thoughtful arrangement and strategic props can transform an ordinary photo into a work of art that captures the essence of dining.
Be Mindful of Angles
When it comes to iphone food photography, the angle from which you shoot can make or break the allure of your dish. Consider employing a top-down angle for your charcuterie board; this perspective not only highlights the vibrant colors and textures but also captures the intricate arrangement of meats, cheeses, and garnishes that entice viewers.
In contrast, a 45-degree angle can add depth and dimension to your pizza photography, showcasing the gooey cheese and perfectly baked crust in a way that invites your audience to reach out and grab a slice.
Experimenting with different angles, such as a diagonal shot, allows for a dynamic composition that can elevate even the simplest salad photography. This technique draws the eye across the plate, emphasizing fresh ingredients and vibrant colors while maintaining a sense of movement. For those looking to market meals effectively,understanding camera lens position is crucial;
a parallel shot can lend a clean and professional look to dessert iphone food photography, ensuring that every detail—from the drizzled chocolate to the delicate sprinkles—is captured beautifully. Whether you’re aiming to recreate the elegance of Old Ebbitt Grill or the rustic charm of L’industrie Pizzeria, remember that the right angle not only showcases your food but tells a story that resonates with your audience.
Get Creative with Editing
Editing photos can transform a simple snapshot into a compelling visual story, especially when utilizing the powerful features of the iPhone Photos app. By experimenting with cropping, you can shift focus to the main subject, enhancing the brilliance of colors and details that might otherwise be lost.
Adjusting saturation and exposure allows for dynamic changes that can elevate your images, making them pop on social media feeds. With the right tweaks, even the most mundane restaurant visuals can turn into mouthwatering branded food photography that grabs attention.
Beyond the built-in Apple editing tools, apps like Darkroom and Afterlight offer advanced functionalities for those looking to take their photo edits to the next level. These platforms provide a variety of editing filters and precise photo adjustments that cater to specific aesthetics, whether you’re aiming for a vibrant look or a more subdued tone.
Additionally, Word Swag can help you incorporate creative typography into your images, adding context and flair to your food photo edits. And if you ever feel unsatisfied with your changes, the ability to revert changes in the iPhone Photos app means you can explore different styles without fear. Remember to keep social media image sizes in mind, ensuring that your visually stunning creations shine across all platforms!
Use Live Photos and Burst Mode for Action Shots
When it comes to capturing dynamic moments in iPhone food photography, leveraging Live Photos and Burst Mode can elevate your action shots to a new level. Imagine the perfect moment when syrup drizzles over a stack of pancakes or queso pours seamlessly into a bowl of nachos; these fleeting instances are ideal candidates for these features.
Live Photos not only capture the still image but also record a brief moment of motion and sound, making your restaurant visuals come alive. You can relive the joy of an egg yolk running perfectly across a plate or drinks pouring with an enticing fizz, allowing viewers to feel like they’re part of the experience.
Burst Mode, on the other hand, is your secret weapon for nailing that key photo amid rapid movement. It snaps multiple frames in quick succession, ensuring you don’t miss that sauce dripping just right or the perfect pour of a craft cocktail.
This feature also simplifies photo selection during editing; you can sift through the burst shots to find that one frame that truly captures the essence of the moment. Plus, with the recent advancements in iPhone camera features, you can save storage by selecting only the best images from a burst, maintaining your library without the clutter. Embrace these tools to transform your action shots into vibrant storytelling moments that resonate with your audience.
Experiment with Close-Ups
Close-ups are a powerful tool in food photography that can transform the ordinary into the extraordinary. By focusing on intricate details, such as the glistening cheese melting on a slice of pizza or the delicate layers of a perfectly baked biscuit, you create an inviting intimacy that draws viewers in.
Experimenting with high dynamic range (HDR) techniques can enhance these close-ups, allowing you to capture the rich textures and vibrant colors that make dishes like fried chicken or decadent desserts irresistible. The contrast between crispy surfaces and creamy fillings can be highlighted beautifully, making each image not just a photo but an invitation to taste.
Incorporating table props into your close-up shots adds an extra layer of visual appeal. Consider using elegant settings that complement your subject; a rustic wooden table can enhance the warmth of sandwiches, while polished glassware might elevate a dessert display.
Play with different camera settings to achieve just the right focus and depth of field, ensuring that the foreground pops while the background softly blurs away. By crafting mouthwatering photos that showcase food detail, you not only entice potential customers but also tell a story about the culinary experience awaiting them on your menu.
Use Your Camera’s Timer
Using your camera’s timer can elevate your photography game, especially when capturing group moments like a staff photo or a family gathering. With an iPhone camera, accessing the timer feature is straightforward; just tap the camera icon, navigate to your settings, and choose between the 3-second or 10-second options.
This simple addition allows you to jump into the frame without the awkwardness of rushing to find a good spot.
For video filming, the timer can be a game changer too. Imagine setting up a scene and having those precious moments captured seamlessly without needing a second person to hit record.
The ability to plan your shot while ensuring everyone is included transforms the way we document our lives. So next time you’re preparing for that perfect group picture or an engaging video, don’t overlook this handy feature—your creative potential awaits!
Capturing the Perfect Food Photo
To capture the perfect food photo using your iPhone food photography, start by leveraging its built-in camera features. Experiment with the Portrait mode to create a stunning depth-of-field effect, which highlights your dish while softly blurring the background. Natural light is your best
friend—position your meal near a window or outdoors to enhance the colors and textures. The iPhone’s ability to adjust exposure and focus allows for quick tweaks, ensuring that every detail of your culinary creation shines through.
Once you’ve snapped the perfect shot, don’t overlook the power of the Photos app and various photo editing apps available for your device. Even minor adjustments in brightness, contrast, and saturation can transform an ordinary image into a visual masterpiece worthy of your social media feed or website.
If you’re in the restaurant business and utilizing platforms like BentoBox for online ordering, compelling iphone food photography can significantly boost your digital presence, drawing in customers eager to savor what you offer. Remember, a professional photographer might have the skills to elevate your images further, but with a bit of creativity and the right tools, anyone can master the art of food photography right from their pocket.
Also Read:The Serious Eats Guide to Food Photography Lighting (2025)
Conclusion
Capturing the perfect iphone food photography is both an art and a science that requires practice, patience, and an understanding of light and composition. By experimenting with angles, props, and natural lighting, you can transform even the simplest meal into a stunning visual feast.
Don’t be afraid to play around with colors and textures to make your dish stand out. Remember, the key is to evoke a sense of taste and desire through your images. So grab your camera or smartphone, and start snapping those delicious moments today!


